Recent Post
Sunday, December 29, 2013

Garage update 5
The garage is getting close to completion, at least the diamond plate siding part is. Honestly, it was a monumental undertaking for me, but I've had a lot of fun with it. Will I ever get back the $ I put into it? Probably not. But, that wasn't the point. The point was to cover up the exposed concrete wall, because it looked awful next to my newly painted garage floors :)Now, the walls look awful next to the diamond plate! That's going to be another monumental undertaking.
This update is a continuation of the stairs. The decking stairs that were there before, I kept... well, most of it anyway. Turns out, they weren't very level to begin with. A little shimming here and there helped, though still I wasn't going to just build them all new from scratch. The banister, I did rebuild, and for that, I planned to create a capped wall.

At this point, I became clear to the fact that I was not going to have enough diamond plate. The two sheets I had remaining, would cover the inside of the capped wall, but not the outside. Fortunately my supplier, Phoenix Metals, had more and offered me 3 more sheets at a similar rate. In total, I used 13 4' x 8' sheets.


Right about this time, I started becoming present to a nagging feeling. Too much diamond plate? Well ya, that's definitely the case, but covering the majority of the outside face with all diamond plate seemed like, extra too much. This is when Amy came out with a drink, and set it on the horizontal 2' x 4' supports inside the capped wall, and said, "you should really make this a shelf so you can set stuff on it."
So that is what I did. Thanks Amy! Now we have style and functionality!
Making the cutouts for the shelf was probably the most physically challenging part of all of this, even more than moving the stairs in and out of place. You see, between two sheets of diamond plate, and the plywood backing, that was a lot of cuts to make. When you cut sheet metal, in this DIY scenario, you use a fiber blade in a skill saw. The metal sheet flexes, vibrates, and wobbles, and if not careful, the back side of the blade will grab the edge and cause violent kickbacks.
I made heavy use of the laser leveler here, all to align the cuts to the holes.

In the following picture, rather than realign the laser, I just used the plywood backing as a template to markup up lines on the diamond plate.

Here is what happens to the fiber blade after a sheet or two of cutting. Fortunately, after this much wear, I can use the fiber blade in my angular grinder.

As back-breaking as it was, shifting, aligning, supporting, adjusting, cutting, marking, filing, 30 times over, cutting the holes for the shelf came out surprisingly accurate.


Though it is not implemented yet, I routed a hole in the top right corner of each recessed shelf cubby. I plan to install recessed LED lighting, the Dream Color stuff, once I start back on the electrical.
Enjoy!
Wednesday, December 18, 2013

Garage update 4
Steady as she goes!I've been continuing my work in the garage, especially on days off such as Thanksgiving, and what looks like now to be the week of x-mas. At times, I've hit slow periods because I'd run out of aluminum J-channel, or just get busy with other stuff, but it's coming along.
The last major hurdle has been the stairs. I finished out the other wall of the garage, with diamond plate, in a couple days. In fact that process went like clockwork. The stairs were a little more complex, perhaps the most yet, probably because I lacked a plan, and didn't have a clear vision for them. But after giving it some last-minute thought, I came up with an idea.
The original stairs were basic decking material, wood & bolts. I didn't feel that would be an attractive option with the other enhancements, and also felt that whatever I did needed to be durable and have traction. For this I bought a couple quarts of truck-bed paint (Rhino Liner). I chose this because it is an epoxy paint with traction built in.

I moved the original stairs back in place, but decided to cover them up with plywood. By itself, plywood chips and flakes, and isn't real smooth. I wanted to help that out by covering it with some type of strong putty. For this I found Water Putty.

That stuff hardens fast, almost too fast, but it is supposed to be strong, and after sanding it down, it smoothed things up for paint. I also capped the front of each stair with treated lumber nosing, hoping this will protect the plywood a little more. Many screws later, the stairs were ready to be painted.


With some paint applied (black truck-bed liner paint), I started to realize that the black paint would make the stairs a bit dangerous to walk up and down if the lighting condition was low. When you walk, it is safer to add points of light for peripheral reference, which is why adding hallway lights in the electrical outlets is common. What could I do to fix that? Searching around the internet, I found just the perfect option: small. round, LED lights.

These lights were a bit pricey, but I found a discount. When they arrived, they were a cinch to install.


Even though they are LED, low voltage, low watts, I wouldn't want them on all the time. Also, I wouldn't want to have to turn on a light switch at the top of the stairs in order for the lights to illuminate, since if you were coming home, you wouldn't necessarily be able to see the stairs in dark lighting before having to climb up them.
I found a solution for this also! At Home Depot, there is a rather cheap motion detection system that has a plug on one side, and an outlet on the other, with a 6 ft. wire that extend to the motion sensor. In the following two pictures, you cane see the little white device at the top of the stairs.

Now, when I walk in front of the detector, either from the top of the stairs or the bottom, the motion sensor activates the light, and leaves them on for a minute, five minutes, 20 minutes, or however long I want, before automatically turning the lights off.


The stairs are starting to look quite nice! But, I did hustle through it, not taking time to trim the edge of each stair's diamond plate. As it is, the stairs just touch the wall, without any connectivity, which kind of bothers me, but I will have to live with it.
Once more aluminum J-channel arrives, I'll finish the stairs with a capped wall. Then a little more electrical wiring, then capping the sides with a shelf, and it will be more or less done (minus painting)!
Enjoy!
Friday, November 22, 2013

Garage update 3
This update is mostly about the wiring in the garage. It might be a little more technical than usual, but if you are into that kinda thing, then read on.The default installation in my Rome included two 3-way light switches (one at the top of the stairs, and the other at the bottom, controlling the garage light), a light switch for the front exterior sconces, and 3 15 amp electrical outlets, for which the primary, next to the tank-less water heater, is a GFCI outlet protecting the other two. For those that don't know what GFCI is, well, it's that type of electrical outlet that has a button on it allowing you to reset, should the internal breaker get tripped, protecting you from electrical shock. They are typically installed near locations that have exposure to water. Just in case, here is what a GFCI looks like:
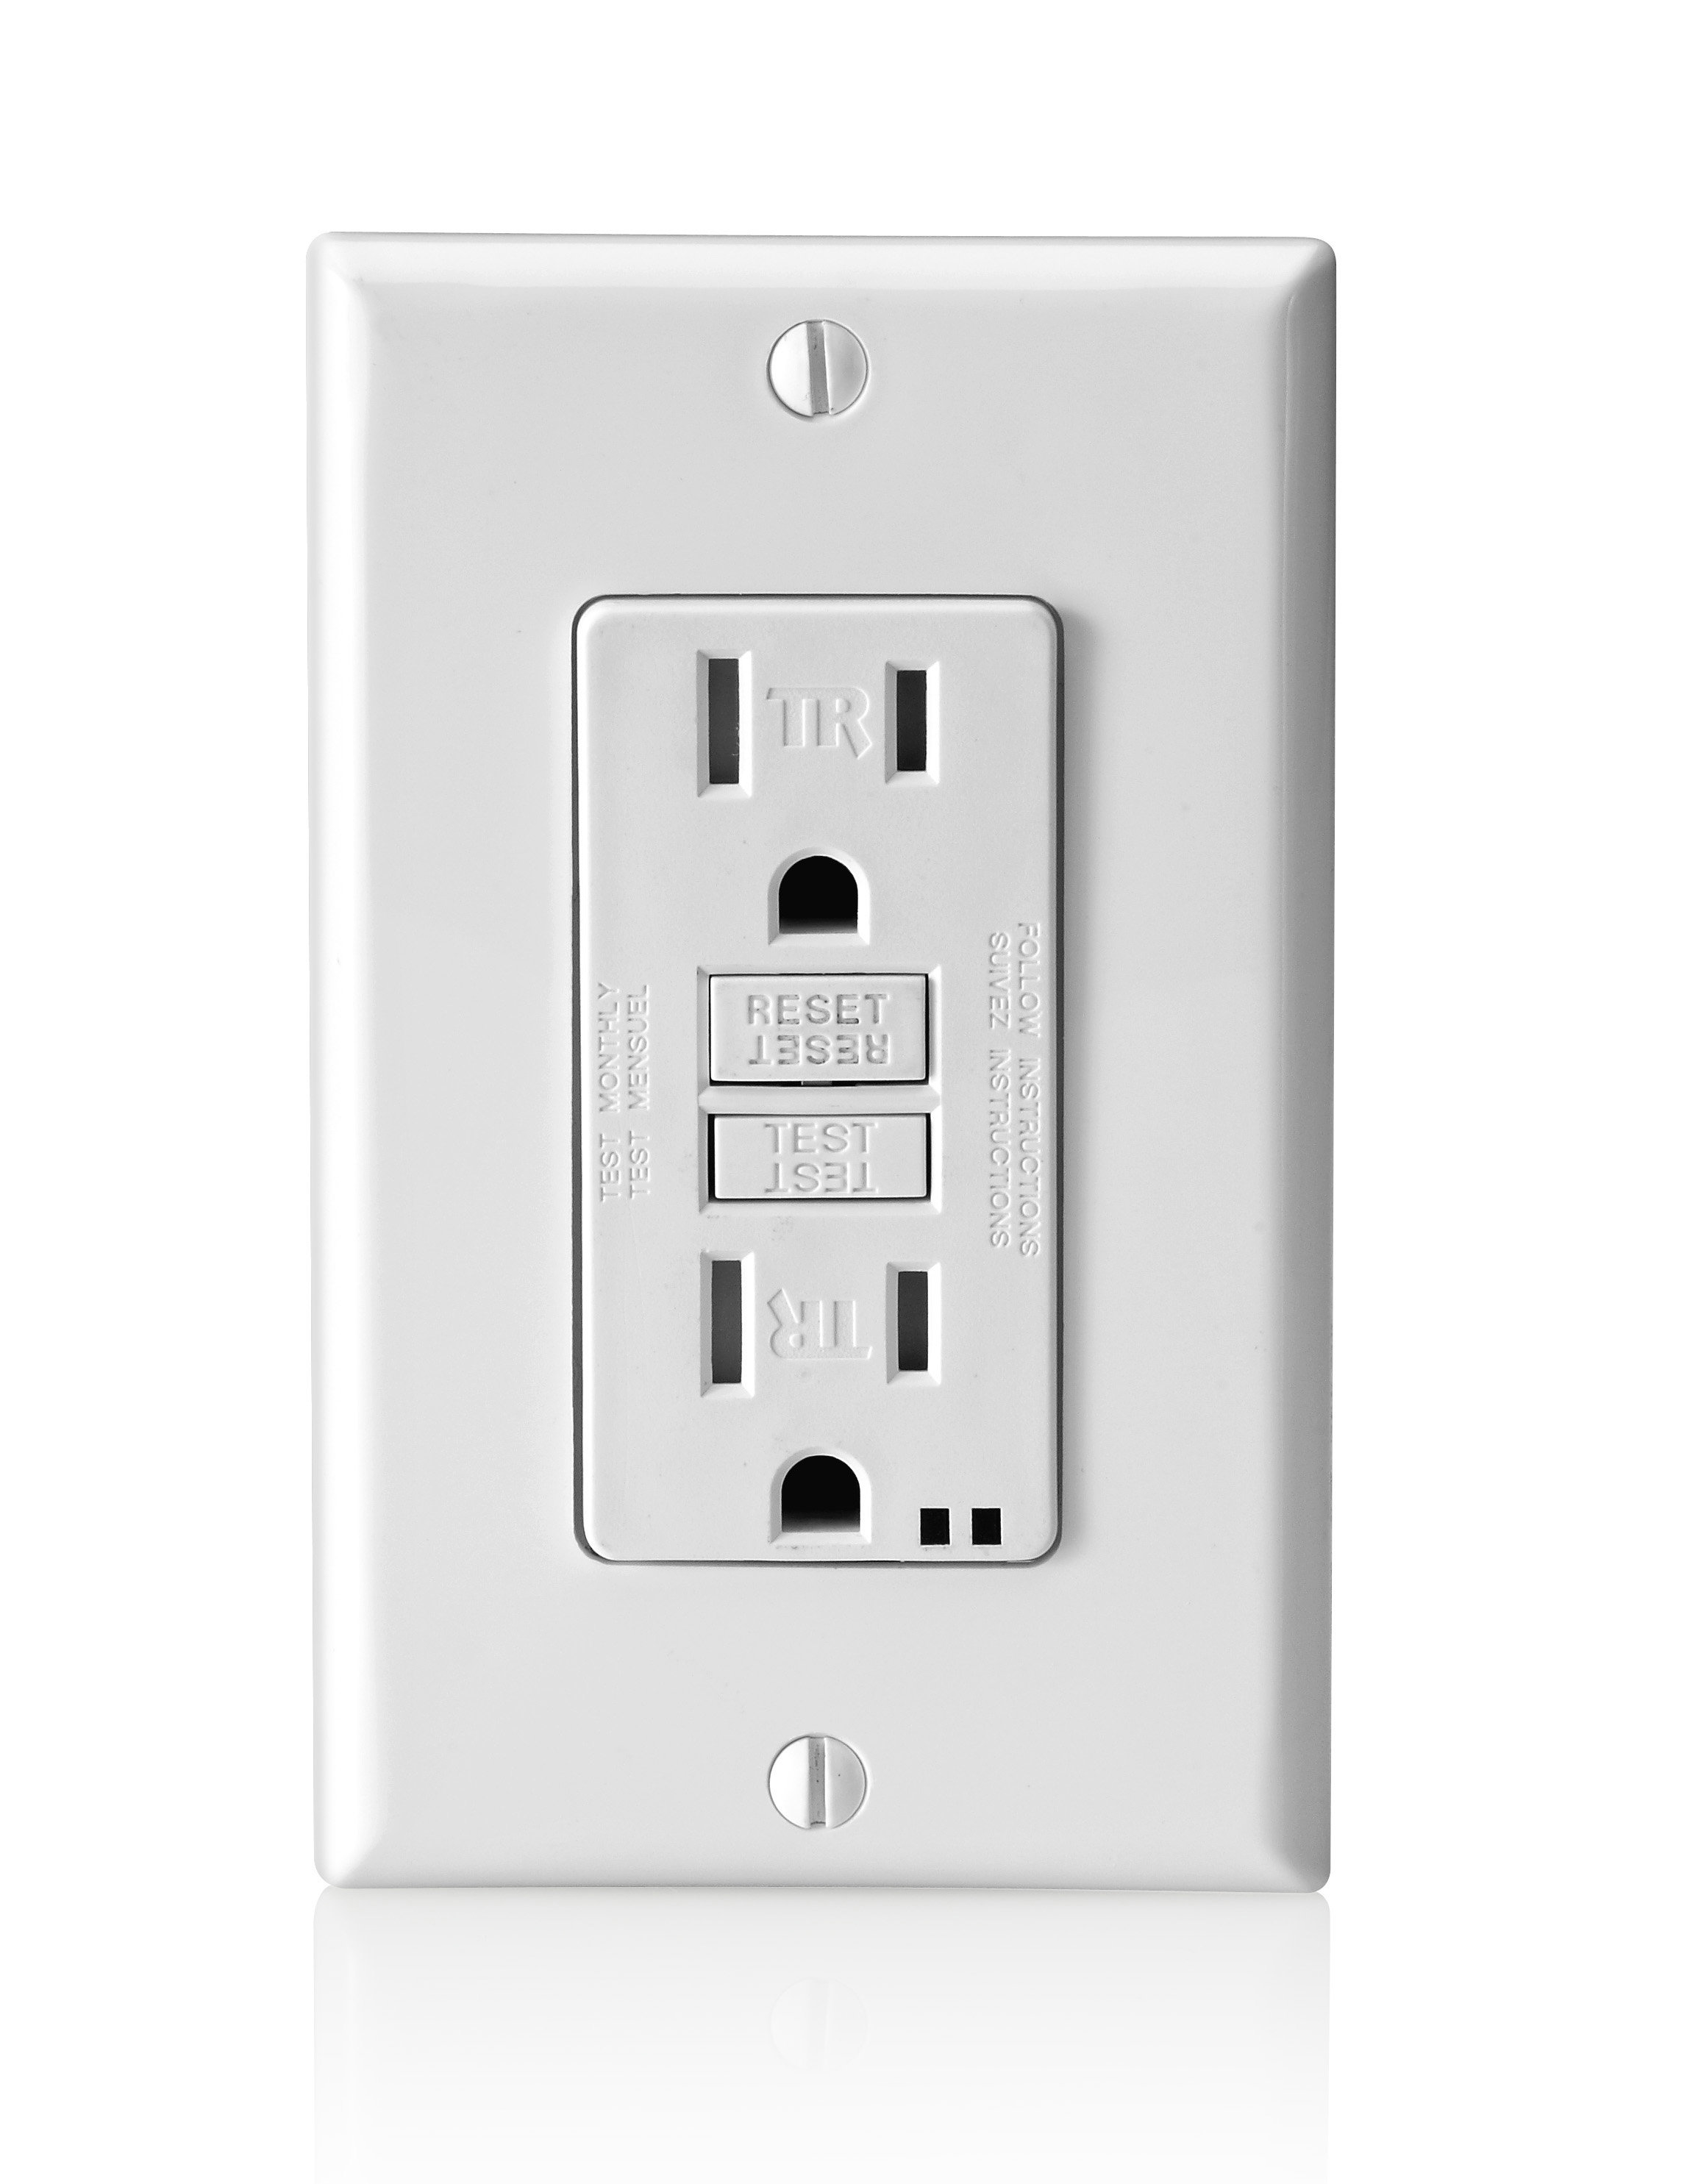
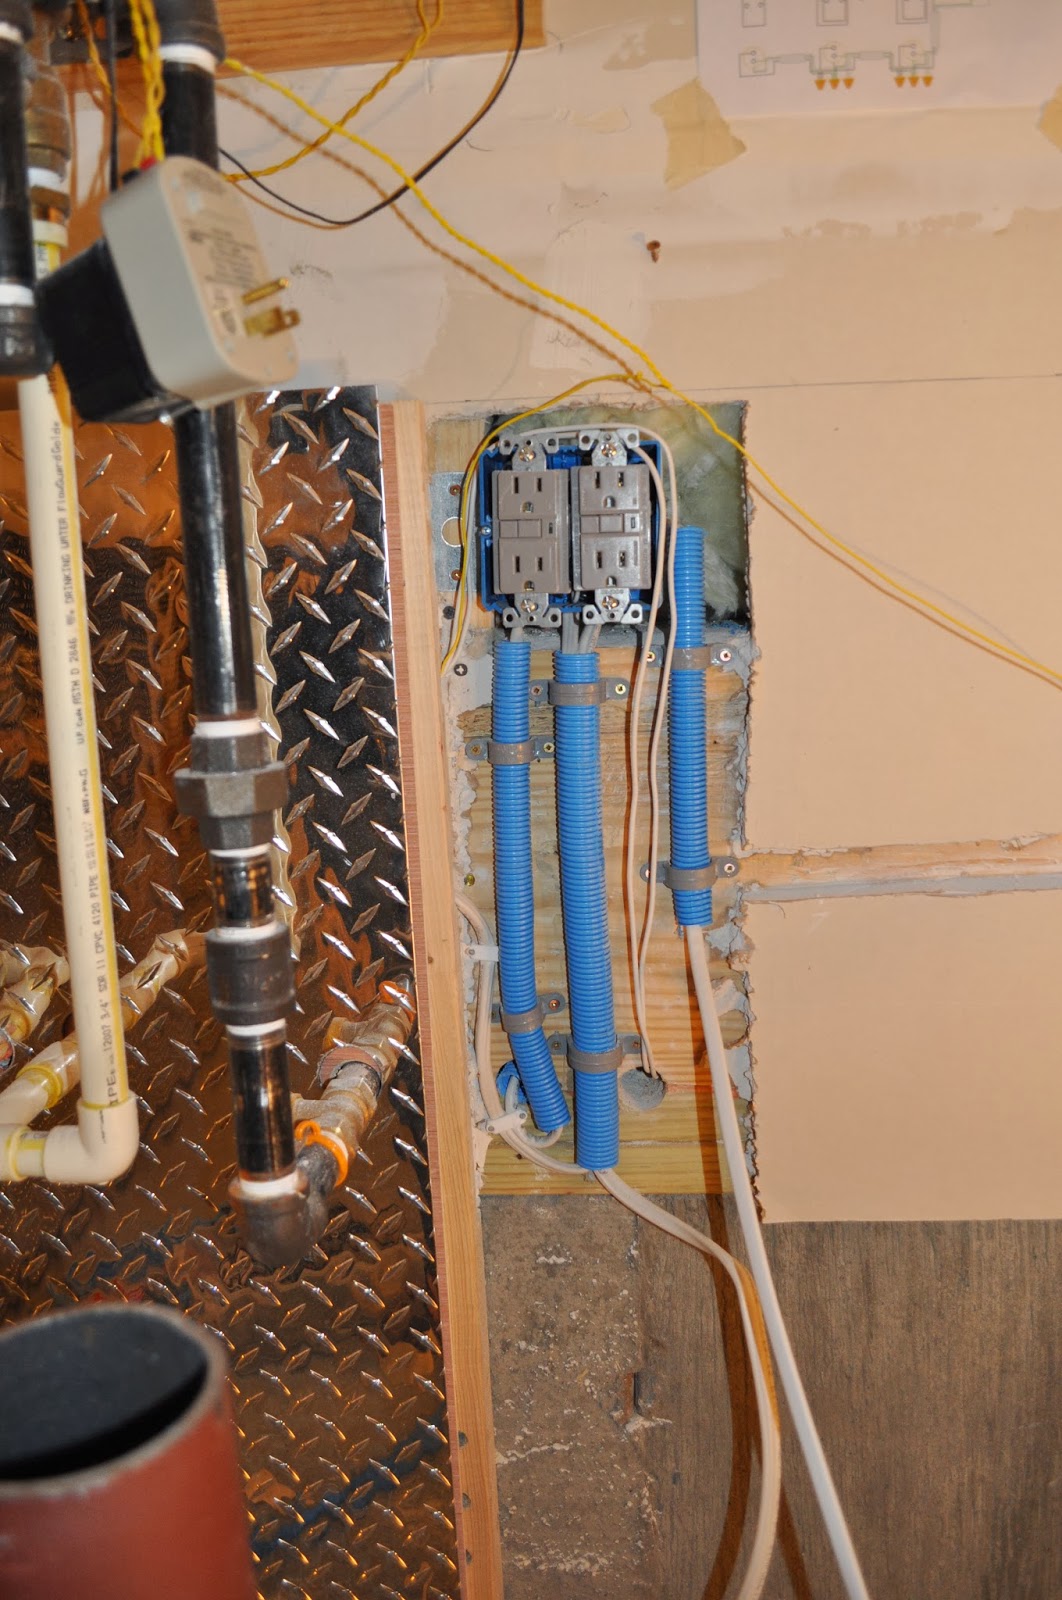
Looking back, I probably should have installed a 20 amp circuit, but I already bought 14-3 wire, 15 amp GFCIs, and 15 amp everything else. To even the load, I installed a separate 15 amp GFCI right next to the one already installed. I was going to install a third GFCI, making 3 dedicated circuits in the garage, but I couldn't find a 3-gang outlet box that had adjustable depth--a requirement because the box would have to telescope in and out to get to the exact depth of the diamond-plate. Here's what one of those look like:

Lowe's only had a 2-gang, so my plan was to replace it and re-install the outlet and add a second one on a dedicated circuit, that way I could connect power tools and additional lighting to the second, while the garage door opener, and tank-less water heater remain on the first.
Problem was I didn't really know the first thing about 14-3 wire, GFCI, or really anything about electrical wiring stuff. So, a big hats off to YouTube and the internet!
Before I had started, I had bought 100' of 14-3 wire. I wasn't sure how I was going to use it, but I intuitively knew that's what I needed. My logic for getting it was, well, I wanted to run additional garage outlets (two on each side of the garage, and be able to power a series of LED lights. The main thing was ensuring that the outlets would lose power if I turned off the light switch.
I also knew that I couldn't proceed any further in my diamond plate DIY project, until I knew the electrical was correct an working as I had envisioned.
Here's a model of my vision:
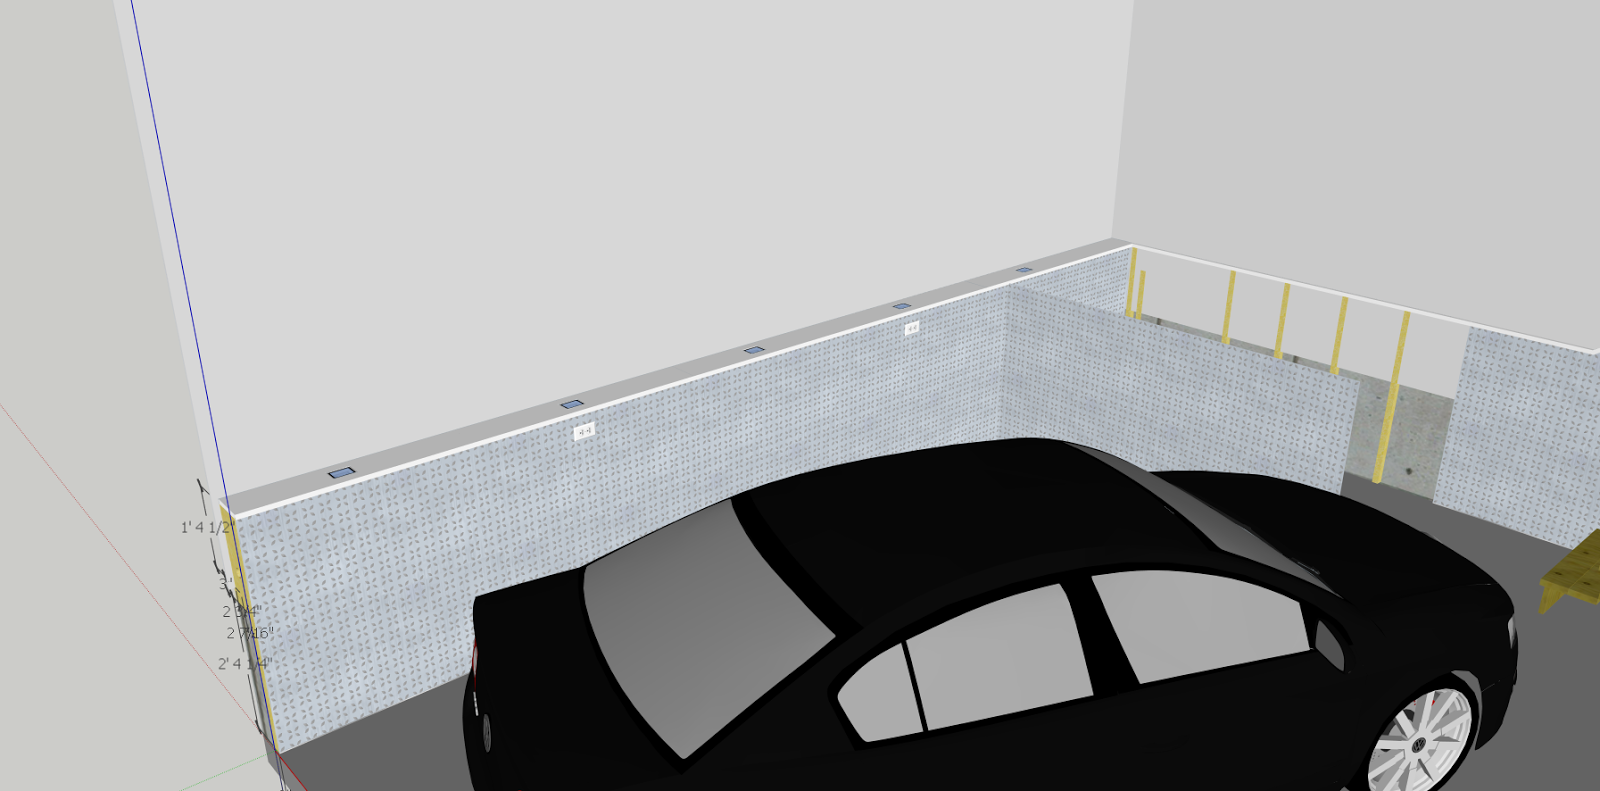
The image above doesn't show the GFCI outlets, but they are on the far, left-corner wall, just to the right of the water heater (also not depicted). But you can see the two added outlets, and five LED lights flush mounted in a shelf.
Nothing ever goes well for me unless I have some idea of what I am doing, and some type of plan. So the other night, before starting on the electrical, I mocked up that plan based upon a bunch of research on the internet.
Here's what I drafted up:

This is an electrical diagram I created, that depicts the wiring in the garage. It isn't complete, in that it doesn't include the exterior wall sconces, the garage light, or light switch, but it does include the default GFCI outlet on a 15 amp circuit. My problem was how to draw all this so the lights were independent of the outlets, yet still sharing the same circuit?
The trick ended up being just as I intuitively guessed, use the 14-3 wire! You see, 14-3 wire actually has 4 wires in it. The extra wire is red, and is typically used for 3-way switches, allowing you to turn lights on/off in two locations. By joining the hot from the GFCI, to the white wire of the switch, and then connecting the extra red wire to the black wire from the switch, allowed me to separate the circuit so the outlets would remain powered when the light switch was off.
You are supposed to add some black electrical tape to the white wire when you do this to allow future electricians to realize the white is now hot. But I just used a black Sharpie and marked some dashes on the wire, kinda like what is depicted.


I am no expert on electrical codes, but I think it's necessary to install conduit if the high-voltage wire is going to be run along the exterior of the wall. So that is what I did, mostly, to protect the wire, even though it was going to be covered up anyway, with diamond plate.
In the last photo above, you can start to see where my work begins encroaching on the second major obstacle of this project--the stairs! The first obstacle was putting plate up around the tank-less water heater. I had been thinking for many days on this, like how would I cut out the stairs so that I could run the plate between it and the wall? You can see how the conduit is blocked by the stairs thus preventing me from wiring up the light switch, and getting the 14-3 wire across the wall for the second half of the garage.
At this point, it became obvious the stairs had to come down!


Taking down the stairs... that was a back-breaking effort! But fortunately they came down in two major pieces, which I should be able to paint more easily and re-install.
After that P.I.A, I continued on and started running the conduit the rest of the distance.


Once the light switch was wired up, I was getting excited!!! Was this whole plan going to work, or was it going to end in a big anti-climactic failure?
I turned back on the circuit breakers, tested and reset the GFCIs, and flipped the light switch. Wooohoooooo! It worked!

Here's me running the light and powering a drill! Yes, the drill still works after flipping the light switch off. Hurray!
With that all tested, I knew the rest of the plan would pan out, so I began installing the everything else... rinse & repeat!


And now the lights...


The lights above were just testers. Today, my 20 watt LED lights came from an Ebay purchase I made. They are much brighter, and will consumes much less energy! The pics below obviously aren't how they will look when it's done, as they will be flush mount sitting inside the shelf. But it is important to test them out. I would have ordered more watts, but it's a size thing, and the 20 watt housing dimensions were the largest I could get and still fit inside, between the wall and the plating.


Electrically a success, I moved on to business as usual, putting up more plate (but the glue is still drying, so have to wait a little more time).


Thanks for reading!
Thursday, November 14, 2013

Garage update 2
It's been a couple days since I've worked on it, but that is mainly because I needed a rest. Over the last weekend I tackled a 3 ft. piece that was to cover the wall behind the tank-less water heater plumbing.
Putting up that 3 ft. piece took all day and then some!
I used an angular saw to cut the PVC pipe, and a plumber's wrench to disconnect the propane gas line. Ya, I know what you are thinking, well I took precautions. Mainly, I turned the gas off at the propane tank, but turned on the fireplace before to ensure the gas was really turned off. I also turned on all the water faucets, but turned off the main water line which was located in the basement. Last I unplugged the water heater.
When I disconnected the gas pipe, there was hardly even a touch of odor. Cutting into the PVC however, revealed some pressure. It took a couple minutes, and maybe a 1/2 gallon of water to drain out. I could hear the tank-less water heater gurgle as the water drained out of it. All was OK, since I had a 5 gal bucket underneath for spillage.
I'd spent several days drilling holes into concrete using a DeWalt Hammer Drill, and that was just pure agony. Sometimes I'd get a mason bit deep enough, but most times it would hit aggregate and just spin around like trying to cut through diamond. Well I got fed up with those back pains, so I went out and bought one of these Bosch Rotary Hammer Drills. WOW! That made a huge difference, like cutting through butter! If you find the need to drill through concrete, do yourself a big favor, and get one of them.
Getting the studs aligned was pretty smooth going. What was a real pain, was aligning the plywood and diamond plate to fit the adjacent wall, and still fit the custom holes I drilled over the tank-less water heater plumbing.
Lots of liquid nail glue, elbow grease, and swearing, I was able to get things lined up close enough.
I figured once the diamond plate was up, I could reconnect the PVC and gas line. I bought two couplers at Lowe's rated for 180 deg. Also picked up some of that yellow plumber's glue that looks like snot.
By this time, it was 2:00 am, and I went out to turn everything back on. Had to reset the fireplace, which then came back on. Had to turn off all the faucets, since they were all open. Last I had to test the hot water, and sure enough, the water was getting hot.
Oh finally! Time for a nice hot shower before going to bed. Um... NO! As soon as I turned on the shower, the water stopped flowing.
Ruh-roh!
I immediately went down to the garage and saw water pouring out the hot water line. Then I ran downstairs to turn off the main.
As I'd guessed, I had unseated the coupler for the hot water line while pushing the other end in. Also, I don't think I gave the glue enough time to dry. All was not lost, as I fixed my error and instead, just went to bed. I got a nice warm shower in the morning though.


The next part is going to be a challenge also, since it involves laying plate up the wall, with angular cuts, and getting behind the stairs.
Enjoy!


Subscribe to:
Posts (Atom)